Why Integrate Citrix NetScaler Gateway with Okta?
Okta is the leading independent provider of identity for the enterprise. The Okta Identity Cloud provides a suite of services which include:
- Single Sign-On (SSO)
- Universal Directory
- Lifecycle Management
- Adaptive Multi-Factor Authentication (MFA)
- API Access Management
- API Products
There are over 6,000 applications in Okta’s Integration Network, offering deep and seamless integration with several on-premises and cloud-based applications. The two main drivers for integrating Citrix NetScaler Gateway with Okta is to make use of Okta’s SSO and Adaptive MFAfeatures.
SSO helps to simplify the user’s experience by providing quicker access to their applications from any location and device. Okta also offers a Desktop Single Sign-On solution which can help further improve the user experience by allowing users to automatically log into Okta when signed into the Windows Active Directory (AD) domain.
Adaptive MFA provides an additional layer of security for your critical applications. It’s designed to leverage indicators such as knowing who someone is, where they are, what device they’re using and can determine certain type of high-risk behavior.
What will we be doing?
Citrix NetScaler Gateway can integrate with Okta as the Identify Provider (IdP) through SAML 2.0 and RADIUS. This article will outline how to configure both integrations, in order to enable SSO and Adaptive MFA on the NetScaler Gateway, using Okta. The Citrix clients will be configured as follows:
- Citrix Receiver for Web
- SAML Authentication
- Citrix Workspace Application
- RADIUS Authentication
Demonstration
The videos below demonstrates what the users will experience once the integration is complete.
Citrix Receiver for Web (SAML)
Citrix Workspace Application (RADIUS)
Before we begin, a few items to note
While the latest version of the Citrix Workspace application supports SAML, the Service Provider initiated (SP-initiated) SAML login flow will only work within the Citrix Workspace app, when configuring the Okta SAML policy as an Advanced Authentication Policy (using an Authentication Profile) on the Gateway virtual server. In order for the full SSO solution described below to work without Federated Authentication Service (FAS), we’ll need to add the Okta SAML policy as a Basic Authentication Policy. Unfortunately, this breaks the SP-initiated SAML login flow in the Workspace app. It’s unclear if that’s something that Citrix plans on changing. Looking at the product road map for the Citrix Workspace App, Okta is listed in the Identity providers list under the “In development” section. https://www.citrix.com/products/citrix-workspace/roadmap.html. I’ll be looking forward to testing that integration once it’s released.
That said, if you wanted the Citrix Workspace application to perform SAML Authentication, and you are ok with your users landing on a Windows logon prompt after authenticating through Okta, then configure the Okta SAML policy using the Advanced Authentication Policy. Otherwise, you’ll need to implement FAS in order to get the full SSO experience into the Citrix Virtual Apps and Desktops environment using the Citrix Workspace application. Again, this article will describe how to use Okta’s RADIUS solution to support the Citrix Workspace application.
What is Required for setup?
- An Okta Production or Preview Tenant.
- Single Sign-On and Adaptive MFA features licensed in the Okta tenant.
- An Okta admin account. (Ideally with Super Admin rights)
- An Okta mastered Service Account with Super Admin rights.
- Okta and Active Directory integration configured.
- MFA policies enabled. (Recommend using Okta Verify)
- Okta Sign-On policy configured with “Prompt for Factor” enabled.
- This can be configured at either the organizational-level, or the application-level.
- At least one Windows Server 2012 R2 or above to serve as the Okta RADIUS Server. (best practice is to use 2 or more servers placed behind a load balancer)
- Functional NetScaler Gateway Virtual Server.
- LDAP Policy. (With the Server Logon Name Attribute set to UserPrincipalName)
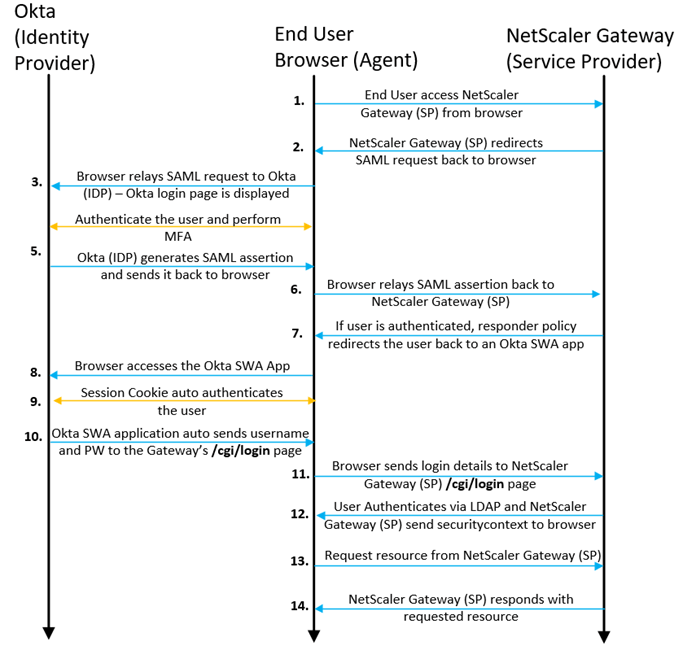
At a high-level, the SAML authentication login flow we’re configuring here will look like this:
Configuration Steps
Configure Citrix NetScaler Application in Okta
Log into your Okta Org using your admin account, and navigate to Applications > Applications.
Click the Add Application button and search for the Citrix NetScaler Gateway application from the Okta Integration Network (OIN).
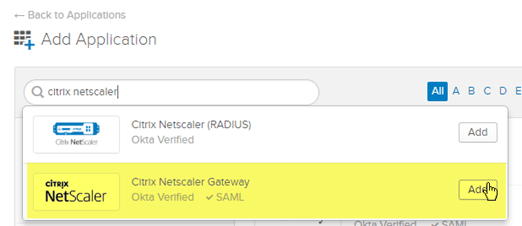
Click Add.
In the Application label field, enter the name that you’d like your users to see when viewing the app in their Okta dashboard. In the Login URL field, enter the URL for your NetScaler Gateway.

Hit Next.
On the Sign-On Options, select SAML 2.0.
Observe the Application username format field. The default setting is the Okta username value. If your Okta deployment Is integrated with Active Directory, by default this value will be set to the user’s UPN. Okta will be sending this value within the SAML assertion that gets forwarded to the NetScaler Gateway for SAML authentication. This will also be required since the LDAP Server on the Gateway is configured to use the UPN for the Server Logon Name Attribute setting.
When logging in through Okta’s IdP sign on page, users can either specify their UPN or their SAMAccountName in the username field. Once successfully authenticated, Okta will forward over the Okta username (UPN) value to the NetScaler Gateway.

Hit Done.
We’ll come back to this Okta application when we configure the SAML integration on the NetScaler Gateway side, so for now we’ll go through the RADIUS configuration setup.
Configure Okta RADIUS Server and Application
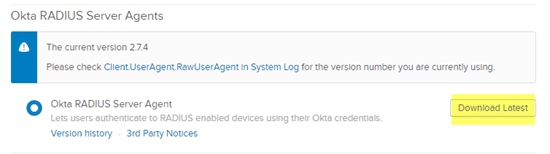
Log on to the Server where you plan to install the RADIUS Agent. On the Server, log into your Okta Org using your account with Super Admin rights, and navigate to Settings > Downloads.
Download the Okta RADIUS Server Agent
Once downloaded, follow the instructions outlined here to install the Agent on the Server. During the installation, make note of the RADIUS Shared Secret and the RADIUS Port that you configure. When you’re asked to sign into your Okta Org, be sure to specify an Okta Mastered Service account with Super Admin rights.
Once the RADIUS Agent installation and configuration is complete, log into your Okta Org using the admin account, and navigate to Applications > Applications.
Click the Add Application button and search for the Citrix NetScaler (RADIUS) app from the OIN. Click Add.

If you’d like, you can give the application a name in the Application label field, and hit Next.
Update the UDP Port and Secret Key fields to reflect the configuration settings set on the RADIUS Server application during the Agent installation.
Leave the Application username format field set to Okta username.
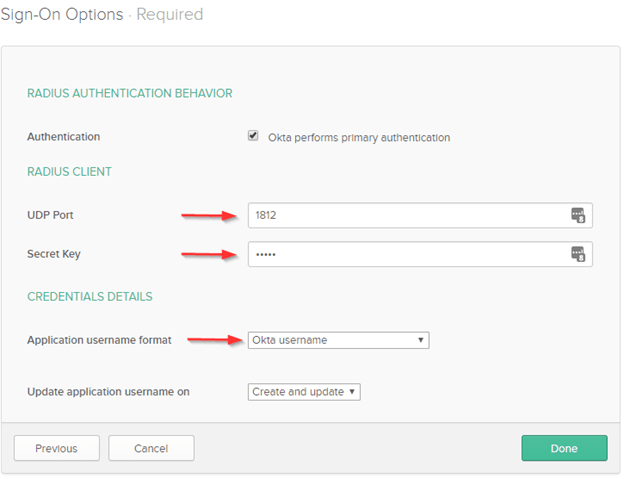
Hit Done when completed.
Navigate to the newly created RADIUS application via the Applications > Applications tab. Click on the Sign On tab. Click Edit on the Advanced RADIUS Settings section and select the following options

Report Client IP will send the user’s client machine IP to Okta.
The last two options under the Authentication section enable Okta’s Autopush for RADIUS feature. This will allow Okta to automatically push an Okta Verify notification to the user’s smart phone when logging in via RADIUS. This is a newly released feature. https://help.okta.com/en/prod/Content/Topics/integrations/radius-autopush.htm
Configure The Secure Web Application (SWA) Template App in Okta
Log into your Okta Org using the admin account, and navigate to Applications > Applications.
Click the Add Application button and in the search type template and look for Template App.
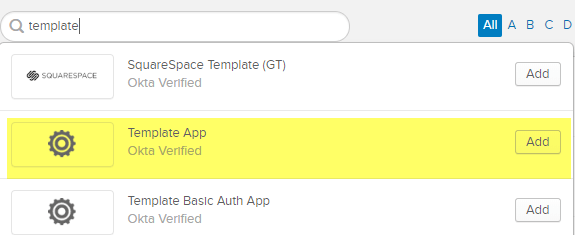
Click Add
After adding the template application, fill out the following fields from the top down.
Application Label: Desired name of the Okta App for labeling purposes
URL: <Access Gateway URL> with /cgi/login appended. Ex. https://gateway.company.com/cgi/login
Username parameter: login
Password parameter: passwd
Optional parameter name: dummy_username
Optional parameter name: dummy_password
Optional parameter name: Logon
Optional parameter name: Log_On
Note: The configuration here will auto send the username and password of the authenticated user to the /cgi/login page on the NetScaler Gateway. The areas where “dummy” is added can literally have any value, but they’ll need to have something. If this is not setup properly, it will result in malformed data being sent to the /cgi/login page, and the users will experience a login loop.
Check both options for Application visibility to prevent this application icon from displaying within the users Okta dashboard.

Hit Next
On the Sign on Methods screen, select Administrator sets username, password is the same as users’ Okta password.
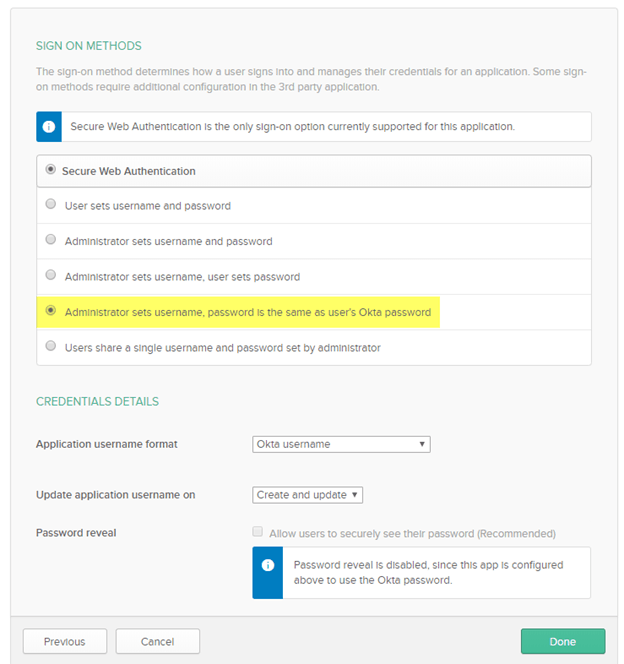
Hit Done.
The last bit of configuration on the Okta side will be to assign users to all 3 newly created Okta applications (Citrix NetScaler Gateway, Citrix NetScaler (RADIUS), & the SWA Template App).
Log into your Okta Org using the admin account, and navigate to Applications > Applications.
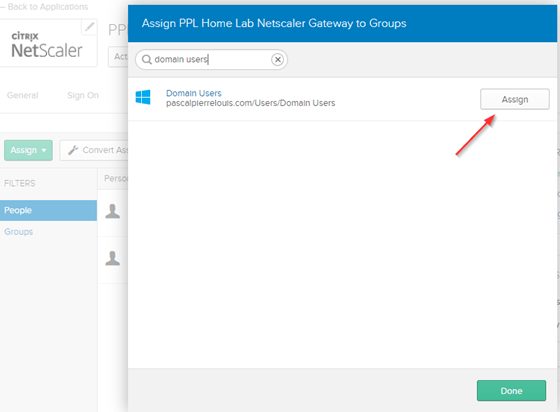
When you click on an application, it will drop you right into the Assignments tab. Hit the Assign button, and select either Assign to People or Assign to Groups. Best practice is to leverage your AD Groups.
Again, you’ll need to make the same assignments for all 3 Okta applications.
Configure NetScaler Settings
Configure SAML on Citrix NetScaler Gateway for Okta
Log into your Okta Org using the admin account, and navigate to Applications > Applications.
Select the Citrix NetScaler Gateway application which you created earlier, and navigate to the Sign On section.
Scroll down to the SAML 2.0 section, and select the View Setup Instructions button

For the most part, you can follow the steps listed in the provided instructions to create the SAML Server and Policy on the NetScaler Gateway.
The following additional steps will need to be taken in order to fully enable the overall solution.
On Step 14 where you’re configuring the SAML Policy, instead of setting the expression to ns_true, you will need to set the following expression
REQ.HTTP.HEADER User-Agent NOTCONTAINS CitrixReceiver
Note: This will allow only the Citrix Receiver Web clients to use the SAML policy. We’ll force the Citrix Workspace Application to use the RADIUS policy.
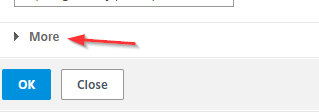
Before finalizing the SAML Server configuration on the NetScaler Gateway, expand More. Navigate to the Two Factor option and switch it to On.
If you’re running a later release of the Citrix Application Delivery Controller (ADC), you can simplify the creation of the SAML Server by supplying the SAML Server configuration the Identity Provider metadata URL for the Citrix NetScaler Gateway application in Okta
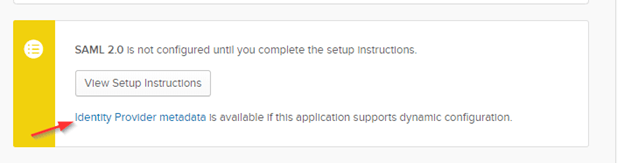
Clicking on the metadata link will bring up a URL that can be used to auto configure several of the required components to setup the SAML Server.
Just copy the URL from the address bar, and add it to the SAML Server configuration.

If you’re using this approach, you’ll still need the following information configured in the SAML Server configuration on the NetScaler Gateway
User Field: Name ID
Signing Certificate Name: Select the name of the certificate bound to your NetScaler Gateway VIP
Issuer Name: Copy and paste this value from the variables section in Okta’s Citrix NetScaler SAML instruction document.
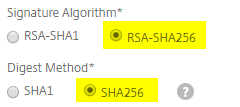
You’ll need to ensure that the Signature Algorithm is set to RSA-SHA265 and Digest Method is set to SHA256
The Citrix ADC will go out and grab all of the remaining data that it needs.
Configure RADIUS on Citrix NetScaler Gateway for Okta
Log into the Citrix ADC and Navigate to NetScaler Gateway > Polices > Authentication > RADIIUS. While in the Policies tab, hit Add.
Give the policy a name. Then on the Server field, hit Add
On the Server configuration, set the following information
Name: Display name of the RADIUS Server
IP address or Server name : Server where the Okta RADIUS Agents were installed.
Port: Port details configured in the Citrix NetScaler (RADIUS) Okta application, and RADIUS Agent.
Secret Key: Secret key details configured in the Citrix NetScaler (RADIUS) Okta application, and RADIUS Agent.
Hit the Test Connection button, and confirm that a successful connection was made.
Time-out (seconds): set to 60 seconds.
Hit Create.
For the Expression enter the following
REQ.HTTP.HEADER User-Agent CONTAINS CitrixReceiver
Note: This will force all Citrix Receiver/Workspace clients to use the RADIUS policy for authentication

Press OK
Create the Responder Policy
Log into your Okta Org using an admin account with rights to manage applications, and navigate to Applications > Applications.
Select the SWA Template App application that was built using template app in an earlier step. Click on the General tab, and scroll down to the bottom of the page and look for the EMBED LINK field. Copy this link value.

Log into the Citrix ADC and navigate to AppExpert > Responder > Polices. Hit Add.
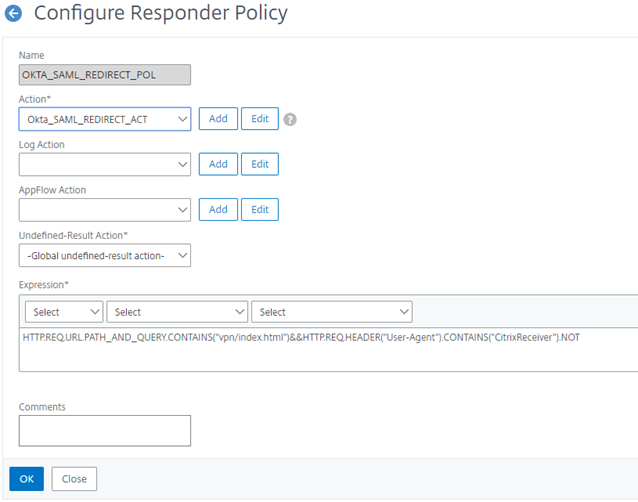
Give the policy a name. Then on the Action field, hit Add
Give the action a name. In the Type field, select Redirect. In the Expression field, paste the EMBED LINK that you copied of the Okta SWA application. Place the link between quotes
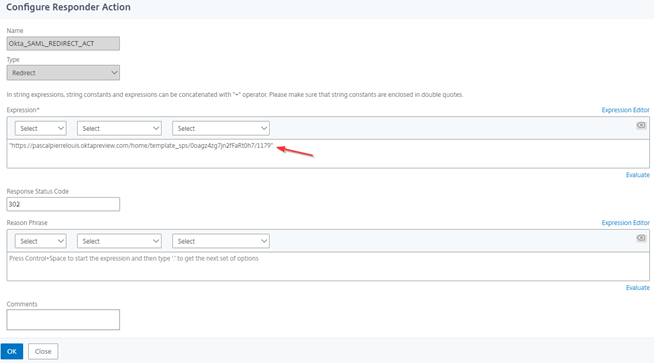
Press Create
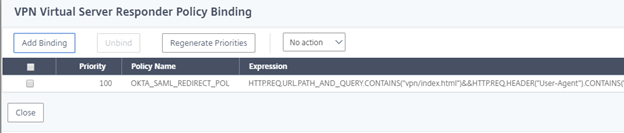
Back on the Responder Policy, within the Expression field, enter the following
HTTP.REQ.URL.PATH_AND_QUERY.CONTAINS(“vpn/index.html”)&&HTTP.REQ.HEADER(“User-Agent”).CONTAINS(“CitrixReceiver”).NOT.
Note: This will only allow the Receiver Web clients to redirect to the Okta SWA application after a successful SAML Auth. This allows the app to automatically pass their username and PW to the LDAP Server configured on the NetScaler Gateway. We do not want this to occur for the Citrix Receiver/Workspace Clients. Those will use RADIUS
Note: This Expression assumes you’re using the X1 Portal Theme on the NetScaler Virtual Server (vpn/index.html). If you are using a different Portal Theme, you’ll need to ensure that the red text within the above expression includes the relevant landing page
Configure the NetScaler Gateway Virtual Server
Log into the Citrix ADC and navigate to NetScaler Gateway > Virtual Servers. Edit the relevant virtual server.
If there are any configured Authentication Profiles or Basic Authentication Polices, remove them.
Once all the previously configured polices have been removed, hit the + symbol next to Basic Authentication. You will add the polices in the following order
SAML:
- On the Choose Policy option select SAML, hit Continue.
- Click into the Select Policy field, and select the Okta SAML Policy.
- Press Select then Bind.
- Add another policy.
RADIUS:
- On the Choose Policy option select RADIUS, hit Continue.
- Click into the Select Policy field, and select the Okta RADIUS Policy.
- Press Select then Bind.
- Add another policy.
LDAP:
- On the Choose Policy option select LDAP, hit Continue.
- Click into the Select Policy field, and select your existing LDAP Policy.
- Press Select then Bind

Now Scroll down to Polices, and hit the + symbol.
On the Choose Policy field, select Responder, and hit Continue.
Click into the Select Policy field, and select the Okta Responder policy. Press Select then Bind.
Hit Done.
Conclusion
Once all of the steps above have been completed, whenever your users access the NetScaler Gateway Server URL, they will be redirected to Okta for authentication, where they’ll sign in, and satisfy the MFA challenge as shown in the demo videos above. This integration will allow you to use Okta to secure and simplify access to your Citrix Virtual Apps and Desktops.